Double Scratch Stock

A scratch stock is a simple but effective tool for cutting moulding patterns. However, when you scratch against the grain as is often necessary, the tool shatters and leaves behind a rough surface.

This double scratch stock solves that problem. Grind or file mirror images of the desired pattern on a cabinet scraper. File the edge to 45°, then turn the burr. Fix the blade in a hardwood block that will act as a depth and fence. Adjust the scraper blade for the proper depth and tighten the screws to lock the blade in place. When you run into contrary grain, simply switch to the other side.

Commentary on flattening a board

In this short video, I’m covering a few small things I missed out in the video “Flattening a board.”

If you haven’t already, please show your support by liking and subscribing to my channel.

AMAZON US

6 inch ,12 inch and 18 inch Anodized Aluminum Straight Edge Bars https://amzn.to/3Vyw7Im

Fulton 24 Inch Long Anodized Aluminum Straight Edge Bar with .001 Tolerance https://amzn.to/3phkjy4

Disclaimer: As an Amazon Associate, I earn from qualifying purchases.

ABOUT OUR CHANNEL: Our channel is about woodworking by hand. We cover lots of cool stuff such as building projects, hand tools and finishes

Check out our channel here: https://www.youtube.com/@TheLostScrollsofHandwork https://www.bitchute.com/channel/ipQGfyiidUh7/

Don’t forget to subscribe!

Veneering for Furniture Makers with Dave Heller

PART ONE
PART TWO
PART 3

I found these three videos to be quite informative. Veneering beautifies the wood and marquetry is art on wood, much like a painting.

Amazon US

Sauers – SCV-20-MXDOM&EXOTIC Veneer Variety Pack 20 Sq. Ft. https://amzn.to/41NZcl9

Amazon Australia

 Mould Master Assorted Wood Veneers, 250g https://amzn.to/3oABDhr

Mould master Veneer Wood, 250g https://amzn.to/43UusAQ

Disclaimer: As an Amazon Associate, I earn from qualifying purchases.

Stains and dyes from The Cabinetmaker’s Guide

by Robert D. Mussey

The Cabinetmaker’s Guide, possibly the first finishing guidebook
printed in America, was a workshop standby throughout the 19th century.
It hasn’t been reprinted recently, but may be available in major
libraries. Note the worker polishing a tabletop by the fire, which is a
good way to keep the wax flowing freely.

I reformulate original stain and dye recipes to determine what the original colours were like. But I use alcohol soluble aniline for restoration or conservation work because they dry quickly, don’t penetrate as deeply, or rapidly as water-soluble aniline, and because they are reasonably lightning fast. I want my conservation to last more than ten years.
One of the first principles of conservation is to make any repair reversible, so it can be redone if a better technique is discovered. Original colours are dramatic, and not yet completely accepted for conservation, so when I colour a piece I put down a barrier coat first, then colour the finish that goes over it. The stain has not soaked into the wood, so the colouring is reversible. On new work, the choice of colour is my own; furniture makers have much more freedom than conservators. I think original colours will become acceptable for furniture conservation, used where appropriate to show people what the maker saw when he had completed the piece.

These recipes are from The Cabinetmaker’s Guide:

Red dye. Take 2 pounds (907.18 g) of genuine brazildust, add four gallons of water, put in as many veneers as the liquid will cover, boil them for 3 hours; then add 2 ounces (75.6 gram) of alum, and 2 ounces (75.6 g) of aquafortis, and keep it lukewarm until it has struck through.

Brazildust ; dust of brazilwood, Caesalpinia echinata, gives a very bright red dye. It was such an important item of commerce, that the country was named after the tree.
Aquafortis is nitric acid, reagent grade concentration.

Fine blue. Take a pound of oil of vitriol in a clean glass phial, into which put 4 oz (151.2 g) of indigo, and proceed as before directed in dyeing.

This dye, and others of similarly unusual colours, would have been used for marquetry or by musical-instrument makers. Oil of vitriol is sulphuric acid.

To stain beech a mahogany colour, take 2 ounces (75.6 gram) of dragon’s blood, break it into pieces and put it into a quart of rectified spirits of wine; let the bottle stand in a warm place, shake it frequently, and when dissolved it is fit for use.

Dragon’s blood has been used for centuries, it is a dark, red resinous exudation from the fruit of the rattan palm, Calamus drago. Spirits of wine, is alcohol distilled from wine; rectified means purified. Ethyl alcohol or shellac thinner from a paint store is the same thing. My reformulation of this stain came out a very bright red.
Dragon’s blood, when compared to other reds, is fairly lightfast. If you stain the wood directly, it is fugitive; but if you dye shellac with it, it is much less so, because the shellac locks the colour in.

Another method for black stain. Take one pound of logwood, boil it in two quarts of water, add a double handful of walnut peeling. Boil it up again, take out chips, add a pint of the best vinegar, and it will be fit for use; apply it boiling hot. Note-This will be much improved if, after it is dry, we take a solution of green copperas dissolved in water, in the proportion of an ounce to a quart, and apply it hot to the above.

Logwood was an important dyestuff from Haematoxylum campechianum, a tree found in Central America and the West Indies. It gives a range of colours from red to purple to black and was used as dust, shavings, or chips.

I have obtained materials for these and other recipes from the following firms: H. Behlen and Bros., Rt. 30 N., Amsterdam, NY. 1 20 1 0 ; Laurence McFadden Co., 7430 State Rd. , Philadelphia, Pa. 19136 ; A. F. Suter and Co. Ltd. , Swan Wharf, 60 Dace Road, Bow, London E3, England; James B. Day Co., Day Lane, Carpentersville, Ill. 60110. For further information: The Artist’s Handbook of Materials and Techniques, Ralph Mayer, Viking, New York, rev.
ed. , 1982. Painting Materials, A short encyclopedia, Rutherford Gettens and George Stout, Dover, 1966. — R. D. M.

Old Finishes

What put the shine on furniture’s Golden Age
by Robert D. Mussey

Finishing is the least studied and most inaccessible aspect of our antique furniture heritage. The proportions and workmanship of a Philadelphia highboy are direct and observable manifestations of the skills of its maker. But what of its finish ? Is the mellow patina, much admired today, anything like the finish that left the workshop 200 years ago?
We can’t learn much from the pieces themselves. Most museum conservators agree that perhaps only one percent of our antique furniture bears indisputable remnants of its original finish. Scientific tests may inadvertently detect later refinishing or modern materials indistinguishable from the originals : there’s no way to tell new beeswax from old. When we turn to historical documents, much obscure, ambiguous or mysterious material conceals the pearls of hard information. The old craft guilds guarded their trade secrets as closely as the independent finishers who proudly, and loudly, announced the discovery of the “perfect” finishing potion. Formularies, cabinetmakers’ and varnishes’ account books, bills, histories, and dictionaries of the period are difficult to interpret. Account books, for example, so rich in information about woods used and prices charged, say little about finishes.
When materials are mentioned, the names vary from region to region: 2 to 5 different words may describe just one material. And more than 200 different resins, oils, fillers, waxes, and pigments were used in 18th and early 19th century furniture finishes.
It is equally difficult to say who did the finishing in 18th century American workshops. I haven’t found a single reference to finishers in any of the hundreds of account books I have examined. Finishing was not a specialised trade in the U.S. as it was in Britain, though there were one or two well known specialists in large cities, like Thomas Johnson in Boston, who did Japanning, graining, marbleising and gilding.
Fancy painting, as on the Baltimore chair, was done by fine-art painters. It seems probable that cabinetmakers, particularly in small shops, did their own finishing, aided by various guide books and formularies. I have spent the past five years negotiating these obstacles, comparing and analysing some 5000 documents, reformulating many of the recipes for stains, dyes and finishes, and applying them using original methods to see how they work and to watch how they age. I have placed more emphasis in my research on books that were frequently reprinted. Any of ten reprinted books was probably a popular one with working craftsmen. The first furniture-finishing guidebook known to have been printed in America, The Cabinetmaker’s Guide, (Greenfield, Mass. ,1825), was reprinted numerous times, and parts were pirated for other books throughout the 19th century. The Guide was pocket-sized, easy to use. I have two copies, from 1827 and 1837, both are dog-eared, paint splattered and muddied signs of a well-used book.
I have formed some broad conclusions from my research; several of these have surprised me. I started out wanting to prove that shellac and French polishing were widely used during the 18th century. Instead, I discovered that French polish was not invented until about 1810, and that oil and wax were the predominant finishes of the period, favoured even on many high-style pieces. And I found that the finish that left the shop was not mellow and glowing, but probably brilliantly coloured, bright and shiny.
Stains, dyes, oils, and waxes will be discussed here, limited to the period 1700 to 1830. Before that time, references are too scattered to be of use, and after 1830, mass production, chemical advances and burgeoning world trade profoundly changed furniture finishing. I’ll discuss the varnishes of the 18th and 19th centuries in a subsequent article.

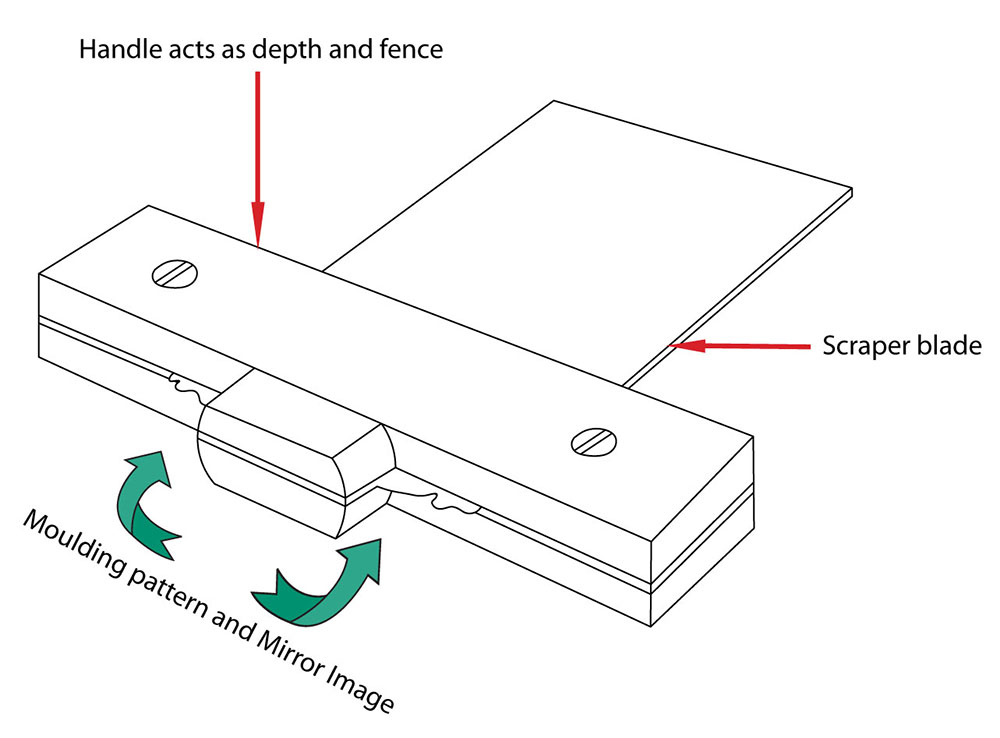
Surface preparation-The quality of the piece determines how much surface preparation it received. No elaborate smoothing practices were used on ordinary pieces, and many table tops clearly display the corrugations left by hand planes. Finer furniture requires more careful preparation. Andre Jacques Roubo’s three-volume treatise, The Art of the Woodworker (Paris: 1769-74) suggests this elaborate sequence for veneered and marquetry pieces: smoothing planes followed by a variety of hooked cabinet scrapers, a hard rub with bundles of rushes (shave- or saw-grass), abrasion with solid pumice-stone blocks lubricated with water, further abrasion with sealskin, and finally, burnishing with slightly rounded blocks of hardwood. 

The Cabinetmaker’s Guide recommends glass-papering the surface after careful scraping. The author complains that glass-paper was being cheapened by adding sand, then gives his own instructions: pulverise broken window glass in an iron mortar, put it through sieves of appropriate fineness, and sift onto the glue-covered surface of heavy cartridge-paper.
Early in the 19th century, many recipes appeared using plaster of Paris, “hartshorn”, and other natural clay-like materials to fill open grain before finishing. These could be dyed or stained and were mixed with a binder such as linseed oil or honey. Such fillers were previously used only on japanned and gilded pieces, where intensely pigmented varnish-paints were laid over a thick filler-ground. If clear finishes were applied over plaster-type fillers, the stain would eventually fade, and the filler would appear as unsightly white speckles. In an earlier grain-filling method, the surface was covered with a thin coating of linseed oil and then abraded with a flat block of solid pumice stone. With enough pressure, the resulting paste of oil and fine wood dust would at least partially fill the grain. After dyeing, the excess was wiped or scraped off.

Colouring- Craftsmen of the 18th century experimented with a vast range of materials for colouring wood and wood finishes.
Documents of the period complain that colours “flee with the light,” and the search for permanent natural pigments and dyes, not only for wood but also for fabrics and paints, spawned an entire industry and vast “scientific ” research. The American colonies were a major source of colourants, such as logwood, indigo, oak bark and walnut bark, all of which were exported in quantities of hundreds of tons. 
Craftsmen then used the terms “stain” and “dye” as imprecisely as craftsmen today. We define “stain” as a thin layer of coloured pigment lightly penetrating the surface of the wood. “Dye” is any substance producing colour changes by chemical reaction with the wood fibre or by diffusion of the coloured dye-stuff deep into the cellular structure of the wood.
Most 18th century stains and dyes would have coloured the wood in several ways at once. Stains with strongly acidic vehicles, like uric acid, or stains containing material like iron filings, would have coloured by chemical reaction as well as by pigments contained in the stain. Likewise, many dyes contained pigments which lodged in the wood fibres. 
The Cabinetmaker’s Guide distinguishes stain from dye by degrees of penetration : Staining differs from the process of dyeing, inasmuch as it merely penetrates just below the surface of the wood, instead of colouring its substance throughout, as it does in dyeing; and one is used for beautifying the face after the work is finished, while the other is employed on the wood before it is manufactured, in the state of veneers, to be cut into strings or bands for inlaying borders and which has of late years got much out of use, principally owing to the fault so much complained of the colours flying.
Nearly all the stains and dyes of the period were extremely fugitive by modern standards. Some would not have lasted more than a few years. Often a museum piece displays only the faded glory of the finisher’s art. Red and yellow colourants, frequently used, faded quickly. Brown stains, mixed with reds, greens and blacks, soon faded to the faint green tint we see today on some antiques. I have found bright red areas preserved beneath the brass of mahogany pieces, a far cry from the brown, red-brown or yellow-brown stains used for period reproductions. Some of my reformulations of the original mahogany stain recipes come close to this brisk hue. 
There is strong documentary evidence that staining of furniture before finishing was much less common in the 18th century than we assume. Thomas Sheraton, in his 1803 Cabinet Dictionary, wrote, “The art of staining wood was more in use at the time when inlaying was in fashion. At present, red and black stains are those in general use.” It is also possible that staining was more common in America than in England, but the documents I’ve examined from throughout the colonies infrequently mention staining and staining materials. 
Rural cabinetmakers may have used stains more often than their city cousins. Rural clients couldn’t afford the finely figured woods or expensive mahogany favoured in high-style Boston or Philadelphia work. So exotic woods were imitated by graining, mahoganizing and staining, or they emphasised the wild grain of a favourite wood, like tiger maple.
Nearly all colourant formulas were based on water or alcohol. These have great clarity and penetration, and deeply accentuate the structure and figure of wood. The rather muddy oil- based-pigment stains common in today’s hardware stores were unknown in the 18th-century finishing shop. Likewise, only a very few period stains resemble the modern class of chemical stains, in which colourants or acids in the wood react with chemical counterparts in the staining solution. 
More than one hundred different materials were used in the 18th century in the making of stains and dyes. These range from the exotic to the mundane-like old files or walnut husks in solutions containing vinegar, urine, or wine.
The Cabinetmaker’s Guide calls for chipped logwood, a source of a valuable red-black dye, verdigris (copper acetate), copper (iron sulphate), and barberry root among other ingredients for dyes. Stains might require archil, a Canary Island lichen, or dragon’s blood, a resin from the fruit of the East Asian rattan palm. A red stain was made from brazilwood extract soaked in quicklime slaked in urine and painted hot onto the wood. If the customer only knew!
Attempting to give more brilliant light fast colours, many of the recipes use such strong vehicles as sulphuric, muriatic or uric acid. Unfortunately, these acids contributed to the decomposition of varnishes applied over the stains. The resins and oils used in the 18th-century varnishes were very sensitive to acids and alkalies, and may be rapidly degraded in reaction with these. This helps account for the survival of so few original varnish finishes.
Besides staining and dyeing the wood directly, finishers also coloured the spirit varnishes they applied to the wood. 
Used to match the colours of diverse woods or to improve drab wood, they were called” changing varnish,” and were coloured with various unusual substances as well as with wood chips and bark of oak, chestnut, walnut, or sumac. Similar mixtures applied to tinware, brassware or furniture brasses were called “Iackers.” Shellac was the dominant resin in these “backers,” its reddish or golden colour heightening the golden effect desired from brass. Shellac is a spirit-soluble resin that Polymerises significantly, the process speeded by heat.
Shellac-based “lackers” were often baked onto metals, giving a very hard, lustrous surface, resistant to oxidation, discoloration, and the formation of copper acetates. Original furniture brasses were probably bright and “brassy,” not at all tarnished like those favoured in today’s reproductions. 

Finishes-Once the wood surfaces were levelled, smoothed, filled and stained, one of several types of coatings was applied. These fall within four broad categories: oil finishes, wax finishes, varnishes, and combinations of these Eighteenth-century writers on finishes list a whole array of criteria for the ideal finish: preservation of the wood from decay and insects, preservation of the colour of the wood, and exclusion of atmospheric moisture . It should also be hard, shining, transparent, and flexible, should not yellow or crack with age or turn white with spills, and it should hold up to hard use. The same qualities are sought by coatings manufacturers today, and no finish, then or now, fills the entire bill. Finishers experimented with an amazing range of materials in the 18th century, and some of their solutions were excellent.
Indeed, some are still used today. Since ancient times, craftsmen have known that various animal, vegetable, and seed oils help to preserve wood. A wide selection of these was offered for sale by American merchants and manufacturers in the 18th century. Linseed (flaxseed) oil, the vehicle for most house paints, was by far the most frequently used furniture-finishing material. Poppy seed and walnut oils were preferred for their light colour and transparency, but they were expensive. Since the men who finished furniture were also gilding picture frames, Japanning tea waiters and painting houses and carriages, it is not surprising that, where possible, they used the same materials throughout their work.
Linseed oil finishes were widely used-despite their disadvantages: they were not durable, waterproof or alcohol proof, and they darkened with age, though they were repaired easily with fresh oil and some rubbing. Free from tariffs imposed by the English, both boiled and raw linseed oil were cheap and widely available. In lists of hundreds of furniture types, several influential English and American trade price-books quote prices only for oil finishing and polishing.
Pressed cold, linseed oil has a very light colour; pressed hot, it is more plentiful, but considerably darker. To bleach out this colour, fresh-drawn linseed oil was placed in shallow pans or bottles in the sunlight. Alternatively, the solid impurities were precipitated by adding fuller’s earth (a naturally occurring aluminium silicate) which absorbed the brownish colouring matter. Egg-white was sometimes added as a purifier. Linseed oil dries very slowly on its own. Coatings of raw oil
may remain tacky for years. Over the centuries, many methods have been tried to make it more siccative , or fast drying. In the late Middle Ages, oil was merely boiled. Later, burnt horn and bone, garlic, powdered lead-crystal glass, or alum were added to the boiling oil to try to enhance its drying properties. Most recipes of the 18th century employed lead compounds as siccatives: litharge, massicot or minium, all lead oxides long used as artists’ pigments. Once boiled, filtered, cooled and bleached, the oil was ready for use. The boiling and purification of linseed oil provided considerable income for many painters and varnishes in New England, but the occupation carried with it the danger of fire. Fire and lead poisoning were the bane of the finisher.
Oil finishing was as simple then as it is today. The oil was applied with a rag or brush, full strength or thinned with turpentine, and allowed to soak into the wood. The excess was wiped off with a coarse rag. After a day’s drying time, another coat was applied, and ideally this was repeated until the wood would accept no more oil. In practice, a few superficial coats were probably all that were used. The total oil-finishing time for a desk may have amounted to only two to four hours. Prices for oil polishing formed a small proportion of the total costs recorded for making a piece. 
Basic oiling practices varied. Sheraton, in his Cabinet Dictionary, outlines a method using brick dust and linseed oil, plain or stained red with alkanet root. Brick dust and oil formed a slightly abrasive paste which was rubbed on the surface until the wood warmed, then cleared off with wheat bran , leaving a bright surface. For off-colour mahogany, or better grade mahogany that” wants briskness of colour,” Sheraton recommends a reddish polishing oil including alkanet root, dragon’s blood, and rose pink, a pigment made with brazilwood dye.
I was surprised to find that wax finishes were also among those commonly used by 18th-century cabinetmakers. Wax, like oil, was cheap, available, and easy to use. It was frequently listed in account books and mentioned in the literature of the period. 
Other natural waxes were known, but beeswax had been favoured for centuries as a finish on wood, a medium for paint, a waterproof stopping for boats, an embalming resin, and a flatting agent and final moisture barrier for varnishes. It is probably the natural organic finish most resistant to destructive oxidation. A modern analysis of beeswax used on a Punic warship showed that the wax remained chemically unchanged after 2, 000 years. This extreme longevity was noted repeatedly by 18th-century writers on finishes. Beeswax was produced in large quantities in New England, where bee culture was a highly developed art. Samuel Grant, a prominent Boston upholsterer and merchant, bought up to 450 lb (204.12 kg) at a time for use in his own shop, for sale to other cabinetmakers and for export to England.
The purification of wax by extraction of the honey impurities with water was cheap and simple, and two forms of purified wax, yellow and white, were known. The yellow still contained some impurities and was less expensive. The white, or clear beeswax, carefully filtered and bleached in the sun, was preferred for the finest work. 
Thomas Sheraton describes two methods of wax polishing he says are typical. “Sometimes they polish with bees wax and a cork for inside work. The cork is rubbed hard on the wax to spread it over the wood, and then they take fine brick-dust and sift it through a stocking on the wood, and with a cloth the dust is rubbed till it clears away all the clamming. At other times, they polish with soft wax, which is a mixture of turpentine and beeswax, which renders it soft, a cloth of itself, will be sufficient to rub it off with.” For chair polish, Sheraton mixed wax with a small quantity of turpentine, heated this in a varnish pan (a double boiler), added Oxford ochre for colour and a little copal varnish. The cooled mixture was worked into a ball and applied with a stiff brush, forced into the grain, and then rubbed off.
Wax finishes were widely used on high-style 18th-century French furniture. The only complete description of this process that I have found is in Roubo’s The Art of the Cabinetmaker. For veneered cabinetwork, the finest quality wax was melted into a polisher, which was a bundle of rags bound tightly with wire, and with which the whole surface was rubbed. The heat generated melted the wax, and the rubbing forced it into the pores. Roubo cautions against using cork polishers, which can get too warm and loosen the veneer. 
When the wax was evenly spread, the excess was scraped off. Roubo’s wax scraper was similar to a cabinet scraper, but with a slightly rounded edge instead of a burr. Cleaned and polished with a rag, the work was “extremely even, and glossy as a mirror.” For porous or reddish woods like rosewood or amaranth, powdered shellac was spread over the wax and rubbed in vigorously with the polisher to fill the open grain and heighten the colour. Colophony (rosin) was used to stop up open grain in black woods like ebony.
A high-gloss finish was typical of nearly all high-style furniture finishes of the 18th century. Experimenting with Roubo’s wax finish, I found that it gives a much higher gloss than we associate with wax finishes today. Roubo built a wax finish in the same way as a varnish finish, and the wax became a fairly thick, coherent body on top of the wood. And he used only 100 % pure beeswax, which has better refracting qualities than today’s wax emulsions. 
Roubo prescribes a different process for common furniture: the wax was mixed with one-third tallow and rubbed off with a serge cloth. In order to spread the wax better and drive it deeper into the open pores, one uses sometimes a sheet-metal pan in which glowing coals have been put, and this is held as close as possible to the work in order to warm the wax. In place of the pan, one can also use a glowing red-hot piece of iron, which is even better, because it makes the wax liquid which flows into the open pores more easily.
Though it was possible to get a high gloss finish with wax, most finishers probably found the required method too time-consuming. Wax also has many of the same disadvantages as oil finishes. An 18th-century writer summarised the advantages and disadvantages of the common wax finish, noting: “Waxing stands shock; but it does not possess, in the same degree as varnish, the property of giving lustre and of heightening its tints. The lustre it communicates is dull, but this inconvenience is compensated by the facility with which any accident that may have altered its polish can be repaired, by rubbing it with a piece of fine cork.” 
Easy to obtain, fast and easy to use and repair, oil and wax finishes were ideally suited for 18th-century finishing needs.
Though pure beeswax finishes are rarely used today, the many virtues of oil finishes, particularly their low sheen, are once again appreciated and have made them a finish of choice, as they were 250 years ago. 

Robert Mussey, of Milton, Mass. , trained as a cabinetmaker and wood finisher, then served an internship in furniture conservation at the Henry Ford Museum. He is head of the furniture conservation workshop at the Society for Preservation of New England Antiquities in Boston, Mass.

Sharpening Screwdrivers

by Michael Podmkaniczky

In 1964, I was blessed with a Latin teacher who was as happy to avoid the drudgery of classical studies as his charges were. His nonacademic interests were wide and varied, and he was easily sidetracked by his resourceful students. On one such ram bling day, while discoursing the development of the internal combustion engine by BMW, he observed that in order to make some vital adjustment, a properly sharpened screwdriver was necessary. This brought a back-row dozer to sudden, albeit sleepy, attention: “Sharpen a screwdriver, sir?”

“Indeed, scholar Westcott. . . Sharpen a screwdriver.”

I don’t remember just what tangent we managed to steer the screwdriver tale toward, but the vignette came back to me the other day when I was asked about the same thing.

The first requirement for a screwdriver is that its blade positively engage the slot of a (wood) screw well enough to re­ main in place while you turn and tighten the fastener. The second is that this must be accomplished without mangling the surrounding wood, or, if the screw is to be countersunk and plugged (as is usually the case in boat building), without de­ forming the bunghole. Screwdrivers straight from the hardware store don’t perform either task very well, but with a little “sharpening” they will.

Since the screw manufacturer kindly provides a slot across the whole width of the screw head, you might as well take advantage of it. You therefore want a screwdriver tip that’s exactly as wide as the screw head and that fits tightly in the slot, so as to bear along its entire width. Thus, you really need a set of drivers, individually matched to each and every screw size you use.

A screwdriver tip that’s too wide will overhang the ends of the slot. When driving a counter­ sunk screw, it will ream out the bunghole, resulting in a poorly fitting and unsightly bung.

If you’re trying to tighten down a screw flush with the surface, that last turn will score the wood around the head, or raise nasty burrs on brass hardware and fittings.

Most manufacturers make screwdrivers with spade-shaped tips, which means that the blade will make the hole even bigger as it goes deeper into the wood. You can prevent this by grinding the tip to a constant width.

A screwdriver tip that’s too thin will bear only at its corners, defacing the screw slot and increasing the likelihood that the tip will jump out of the channel and gouge the woodwork. This problem, bad enough with flat-head screws, is even worse with round-heads because the slot is so shallow at the extremes. Ask yourself why you push so hard when tightening a fastening with a stock tool. The answer is that you’re trying to keep the tip from parting company with the slot.

Because the threads of a screw do all the work, pulling it-

tightly into the wood, you should have only to apply torque; forward pressure should be unnecessary. But the faces of a stock screwdriver taper slightly, preventing the blade from squarely contacting the slot’s sides, and the tip therefore tends to ride up and out when torque is applied. The harder you twist, the greater the tendency of the tip to pop out, and the greater the force required to keep it jammed in place. If the tip does jump out, all the force you’re exerting will be directed at the surrounding wood, too bad ! Yankee-style screwdrivers can apply only as much “push” as the spring is strong, and they invariably pop out if not dressed properly. The result is a less than-decorative “Yankee Doodle” across your pride and joy.

The solution is to dress the tip of the screwdriver so that its faces are parallel to the sides of the slot. Bits designed to be power-driven with an electric drill are invariably ground this way by the manufacturer-they would be lethal otherwise. You can grind a screwdriver to the correct shape as easily as you would hollow-grind the bevel on a chisel. The tip will wear in use, and now and then you’ll have to go to the grinder to square up rounded edges. Such touch-ups will gradually shorten
the blade, but you should be able to drive a few thousand screws before you have to hollow-grind the blade again.

For major league screw installation, such as in boat planking, maximum torque is supplied by a brace and screwdriver bit. Once in a great while, this may even break a screw, but a properly sharpened screwdriver bit will engage the slot so well that even a screw that’s been broken above the threads can be coaxed Out of the bunghole by turning it counterclockwise with the brace and gently pulling it. Try that with a stock bit. The ultimate touch, the pièce de résistance of the craftsman’s ego, is to ever so slightly grind away the corners of the sharpened tool to make the tip conform perfectly to the bevelled edges of the screw slot.

Michael Podmaniczky is a boat builder and Windsor chair maker. He lives in Thomaston, Maine.

Make yourself a Disposable Foam Brush

A disposable foam brush is ideal for applying varnish and shellac because it eliminates brush marks and is disposable. These brushes have become expensive for such a simple tool. Get some foam offcuts from any foam and rubber store and some scraps from your offcuts bin.

Use a sharp knife or Stanley blade works well here and cut out a small mortise. The wood can be of any size or thickness, just make sure you either round off the end that’s going into the mortise or bevel it like I have. To be truthful, I just thought about rounding it off, I think that is a much simpler and quicker way. Insert it and staple it the foam to the stick.

You can also buy them on Amazon

US

https://amzn.to/3KFDYPh

AUSTRALIAN

https://amzn.to/3mtSnq1

Disclaimer: As an Amazon Associate I earn from qualifying purchases.

Old Finishes

Once upon a time, furniture was made to last a lifetime and look good for a century. During what has been aptly called the furniture trade’s Golden Age, craftsmen combined the aesthetics of furniture design with the science of finishing.

The finishes used by furniture makers of the 19th century provide some of the best examples of durable antique finishes still in existence today. Many of these finishes were derived from naturally occurring substances, materials, and processes that provided different looks, levels of protection, and applied builds of varying sheen.

What put the shine on furniture’s Golden Age
by Robert D. Mussey

This is an extract I painstakingly rewrote from an old FWW magazine because I thought it is a good read and worth doing.

Finishing is the least studied and most inaccessible aspect of our antique furniture heritage. The proportions and workmanship of a Philadelphia highboy are direct and observable manifestations of the skills of its maker. But what of its finish? Is the mellow patina, much admired today, anything like the finish that left the workshop 200 years ago?
We can’t learn much from the pieces themselves. Most museum conservators agree that perhaps only one percent of our antique furniture bears indisputable remnants of its original finish. Scientific tests may inadvertently detect later refinishing or modern materials indistinguishable from the originals there’s no way to tell new beeswax from old.
When we turn to historical documents, much obscure, ambiguous or mysterious material conceals the pearls of hard information. The old craft guilds guarded their trade secrets as closely as the independent finishers who proudly, and
loudly, announced the discovery of the “perfect” finishing potion.
Formularies, cabinetmakers’ and varnishes’ account books, bills, histories, and dictionaries of the period are difficult to interpret. Account books, for example, so rich in information about woods used and prices charged, say little
about finishes.
When materials are mentioned, the names vary from region to region 25 different words may describe just one
material. And more than 200 different resins, oils, fillers, waxes and pigments were used in 18th and early 19th-century furniture finishes.
It is equally difficult to say who did the finishing in 18thcentury American workshops. I haven’t found a single reference to finishers in any of the hundreds of account books I have examined. Finishing was not a specialised trade in the U.S. as it was in Britain, though there were one or two well-known specialists in large cities, like Thomas Johnson in Boston, who did Japanning, graining, marbleising and gilding. Fancy painting, as on the Baltimore chair, was done by fine-art painters. It seems probable that cabinetmakers, particularly in small shops, did their own finishing, aided by various guidebooks and formularies.
I have spent the past five years negotiating these obstacles, comparing and analysing some 5000 documents, reformulating many of the recipes for stains, dyes and finishes, and applying them using original methods to see how they work and to watch how they age. I have placed more emphasis in my research on books that were frequently reprinted. Any of ten reprinted books was probably a popular one with working craftsmen. The first furniture-finishing guidebook known
to have been printed in America, The Cabinetmaker’s Guide, (Greenfield, Mass., 1825), was reprinted numerous times, and parts were pirated for other books throughout the 19th century. The Guide was pocket-sized, easy to use. I have two copies, from 1827 and 1837, both are dog-eared, paint splattered and muddied signs of a well-used book.
I have formed some broad conclusions from my research several of these have surprised me. I started out wanting to prove that shellac and French polishing were widely used during the 18th century. Instead, I discovered that French polish was not invented until about 1810, and that oil and wax were the predominant finishes of the period, favoured even on many
high-style pieces. And I found that the finish that left the shop was not mellow and glowing, but probably brilliantly coloured, bright and shiny.
Stains, dyes, oils, and waxes will be discussed here, limited to the period 1700 to 1830. Before that time, references are too scattered to be of use, and after 1830, mass production, chemical advances and burgeoning world trade profoundly changed furniture finishing. I’ll discuss the varnishes of the 18th and 19th centuries in a subsequent article.
Surface preparation-The quality of the piece determined. how much surface preparation it received. No elaborate
smoothing practices were used on common pieces, and many table tops clearly display the corrugations left by hand planes. Finer furniture required more careful preparation. Andre Jacques Roubo’s three-volume treatise, The Art of the Woodworker (Paris: 1769-74) suggests this elaborate sequence for veneered and marquetry pieces: smoothing planes followed by a variety of hooked cabinet scrapers, a hard rub with bundles of rushes (shave- or saw-grass), abrasion with solid pumice-stone blocks lubricated with water, further abrasion with sealskin, and finally, burnishing with slightly
rounded blocks of hardwood.
The Cabinetmaker’s Guide recommends glasspapering the surface after careful scraping. The author complains that
glass-paper was being cheapened by adding sand, then gives his own instructions: pulverise broken window glass in an iron mortar, put it through sieves of appropriate fineness, and sift onto the glue-covered surface of heavy cartridge-paper.
Early in the 19th century, many recipes appeared using plaster of Paris, “hartshorn “, and other natural clay-like materials to fill open grain before finishing. These could be dyed or stained and were mixed with a binder such as linseed oil or honey. Such fillers were previously used only on japanned and gilded pieces, where intensely pigmented varnish-paints were laid over a thick filler-ground. If clear finishes were applied over plaster-type fillers, the stain would eventually fade, and the filler would appear as unsightly white speckles.
In an earlier grain-filling method, the surface was covered with a thin coating of linseed oil and then abraded with a flat block of solid pumice stone. With enough pressure, the resulting paste of oil and fine wood dust would at least partially fill the grain. After dyeing, the excess was wiped or scraped off.
Colouring– Craftsmen of the 18th century experimented with a vast range of materials for colouring wood and wood finishes.
Documents of the period complain that colours flee with the light, and the search for permanent natural pigments and dyes, not only for wood but also for fabrics and paints, spawned an entire industry and vast “scientific” research.

The American colonies were a major source of colorants, such as logwood, indigo, oak bark and walnut bark, all of which were exported in quantities of hundreds of tons. Craftsmen then used the terms “stain” and “dye” as imprecisely as craftsmen today. We define “stain” as a thin layer of coloured pigment lightly penetrating the surface of the wood.
“Dye” is any substance producing colour changes by chemical reaction with the wood fibre or by diffusion of the coloured dyestuff deep into the cellular structure of the wood.
Most 18th-century stains and dyes would have coloured the wood in several ways at once. Stains with strongly acidic vehicles, like uric acid, or stains containing material like iron filings, would have coloured by chemical reaction
as well as by pigments contained in the stain. Likewise, many dyes contained pigments, which lodged in the wood fibres.
The Cabinetmaker’s Guide distinguishes stain from dye by degrees of penetration: Staining differs from the process of dyeing, inasmuch as it merely penetrates just below the surface of the wood, instead of colouring its substance throughout, as it does in dyeing; and the one is used for beautifying the face after the work is finished , while the other is employed on the wood before it is manufactured, in the state of veneers, to be cut into strings or bands for inlaying borders and which has of late years got much out of use, principally owing to the fault so much complained of the colours flying.
Nearly all the stains and dyes of the period were extremely fugitive by modern standards. Some would not have lasted more than a few years. Often a museum piece displays only the faded glory of the finisher’s art. red and yellow colorants, frequently used, faded quickly.
Brown stains, mixed with reds, greens and blacks, soon faded to the faint green tint we see today on some antiques. I have found bright red areas preserved beneath the brasses of mahogany pieces, a far cry from the brown, red- brown or yellow-brown stains used for period reproductions. Some of my reformulations of original mahogany stain recipes come close to this brisk hue.
There is strong documentary evidence that staining of furniture before finishing was much less common in the 18th century than we assume. Thomas Sheraton, in his 1803 Cabinet Dictionary, wrote, “The art of staining wood was more in use at the time when inlaying was in fashion; at present red and black stains are those in general use. It is also possible that staining was more common in America than in England, but the documents I’ve examined from throughout the colonies infrequently mention staining and staining materials.
Rural cabinetmakers may have used stains more often than their city cousins. Rural clients couldn’t afford the finely figured woods or expensive mahogany favoured in high-style Boston or Philadelphia work. So exotic woods were imitated by graining, mahoganizing and staining, or they emphasized the wild grain of a favourited wood, like tiger maple.
Nearly all colorant formulas were based on water or alcohol. These have great clarity and penetration, and deeply accentuate the structure and figure of wood. The rather muddy oil- based-pigment stains common in today’s hardware
stores were unknown in the 18th-century finishing shop. Likewise, only a very few period stains resemble the modern class of chemical stains, in which colourants or acids in the wood react with chemical counterparts in the staining solution.

More than one hundred different materials were used in the 18th century in the making of stains and dyes. These range from the exotic to the mundane-like old files or walnut husks in solutions containing vinegar, urine or wine.
The Cabinetmaker’s Guide calls for chipped logwood, a source of a valuable red-black dye, Verdigris (copper acetate), copperas (iron sulphate), and barberry root among other ingredients for dyes. Stains might require archil, a Canary Island lichen, or dragon’s blood, a resin from the fruit of the East Asian rattan palm. A red stain was made from brazilwood extract soaked in quicklime slaked in urine and painted hot onto the wood. If the customer only knew!
Attempting to give more brilliant lightfast colours, many of the recipes used such strong vehicles as sulphuric, muriatic or uric acids. Unfortunately, these acids contributed to the decomposition of varnishes applied over the stains.
The resins and oils used in the 18th-century varnishes were very sensitive to acids and alkalis and may be rapidly degraded in reaction with these. This helps account for the survival of so few original varnish finishes.
Besides staining and dyeing the wood directly, finishers also coloured the spirit varnishes they applied to the wood.
Used to match the colours of diverse woods or to improve drab wood, they were called ” changing varnish,” and were coloured with various unusual substances as well as with wood chips and bark of oak, chestnut, walnut or sumac. Similar mixtures applied to tinware, brassware or furniture brasses were called ” Ackers.” Shellac was the dominant resin in these ” ackers,” its reddish or golden colour heightening the golden effect desired from brass.
Shellac is a spirit-soluble resin that polymerizes significantly, the process speeded by heat.
Shellac-based ” ackers ” were often baked onto metals, giving a very hard, lustrous surface, resistant to oxidation, discoloration, and the formation of copper acetates. Original furniture brasses were probably bright and ” brassy,” not at all tarnished like those favoured on today’s reproductions.
Finishes- Once the wood surfaces were levelled, smoothed, filled and stained, one of several types of coatings was applied. These fall within four broad categories: oil finishes, wax finishes, varnishes, and combinations of these.
Eighteenth-century writers on finishes list a whole array of criteria for the ideal finish: preservation of the wood from decay and insects, preservation of the colour of the wood, and exclusion of atmospheric moisture. It should also be hard, shining, transparent and flexible, should not yellow or crack with age or turn white with spills, and it should hold up to hard use. The same qualities are sought by coatings manufacturers today, and no finish, then or now, fills the whole bill. Finishers experimented with an amazing range of materials in the 18th century, and some of their solutions were excellent. Indeed, some are still used today.
Since ancient times, craftsmen have known that various animal, vegetable and seed oils help to preserve wood. A wide selection of these was offered for sale by American merchants and manufacturers in the 18th century. Linseed (flaxseed)
oil, the vehicle for most housepaint’s, was by far the most frequently used furniture-finishing material. Poppyseed and walnut oils were preferred for their light colour and transparency, but they were expensive. Since the men who
finished furniture were also gilding picture frames, Japanning tea waiters and painting houses and carriages, it is not surprising that, where possible, they used the same materials throughout their work.

Linseed oil finishes were widely used-despite their disadvantages: they were not durable, waterproof or alcohol proof, and they darkened with age, though they were repaired easily with fresh oil and some rubbing. Free from tariffs imposed by the English, both boiled and raw linseed oil were cheap and widely available.
In lists of hundreds of furniture types, several influential English and American trade price-books quote prices only for oil finishing and polishing.
Pressed cold, linseed oil has a very light colour; pressed hot, it is more plentiful, but considerably darker. To bleach out this colour, fresh-drawn linseed oil was placed in shallow pans or bottles in the sunlight.

Alternatively, the solid impurities were precipitated by adding fuller’s earth (a naturally occurring aluminium silicate) which absorbed the brownish colouring matter. Egg-white was sometimes added as a purifier.
Linseed oil dries very slowly on its own. Coatings of raw oil may remain tacky for years. Over centuries, many methods had been tried to make it more siccative, or fast drying. In the late Middle Ages, the oil was merely boiled. Later,
burnt horn and bone, garlic, powdered lead-crystal glass, or alum were added to the boiling oil to try to enhance its drying properties.
Most recipes of the 18th century employed lead compounds as siccative: litharge, massicot or minimum, all lead oxides long used as artists’ pigments.

Once boiled, filtered, cooled and bleached, the oil was ready for use. The boiling and purification of linseed oil provided considerable income for many painters and varnishers in New England, but the occupation carried with it the danger of fire. Fire and lead poisoning were the bane of the finisher.
Oil finishing was as simple then as it is today. The oil was applied with a rag or brush, full strength or thinned with turpentine, and allowed to soak into the wood. The excess was wiped off with a coarse rag. After a day’s drying time,
another coat was applied, and ideally this was repeated until the wood would accept no more oil. In practice, a few superficial coats were probably all that were used. Total oil-finishing time for a desk may have amounted to only two to four hours.
Prices for oil polishing formed a small proportion of the total costs recorded for making a piece.
Basic oiling practices varied. Sheraton, in his Cabinet Dictionary, outlines a method using brick dust and linseed oil, plain or stained red with alkanet root. Brick dust and oil formed a slightly abrasive paste which was rubbed on the surface until the wood warmed, then cleared off with wheat bran, leaving a bright surface. For off-colour mahogany, or better grade mahogany that ” wants briskness of colour.”
Sheraton recommends a reddish polishing oil including alkanet root, dragon’s blood, and rose pink, a pigment made with brazilwood dye.
I was surprised to find that wax finishes were also among those commonly used by 18th-century cabinetmakers. Wax, like oil, was cheap, available and easy to use. It was frequently listed in account books and mentioned in the literature of the period.
Other natural waxes were known, but beeswax had been favoured for centuries as a finish on wood, a medium for paint, a waterproof stopping for boats, an embalming resin, and a flatting agent and final moisture barrier for varnishes. It is probably the natural organic finish most resistant to destructive oxidation. A modern analysis of beeswax used on a Punic warship showed that the wax remained chemically unchanged after 2,000 years. This extreme longevity was noted repeatedly by 18th-century writers on finishes. Beeswax was produced in large quantities in New England, where bee culture was a highly developed art. Samuel Grant, a prominent Boston upholsterer and merchant, bought up to 450 lb. at a
time for use in his own shop, for sale to other cabinetmakers and for export to England.
The purification of wax by extraction of the honey impurities with water was cheap and simple, and two forms of purified wax, yellow and white, were known. The yellow still contained some impurities and was less expensive. The white, or clear beeswax, carefully filtered and bleached in the sun, was preferred for the finest work.
Thomas Sheraton describes two methods of wax polishing he says are typical. ” Sometimes they polish with bees wax and a cork for inside work. The cork is rubbed hard on the wax to spread it over the wood, and then they take fine brick-dust and sift it through a stocking on the wood, and with a cloth the dust is rubbed till it clears away all the clamming’s. At other times they polish with soft wax, which is a mixture of turpentine and beeswax, which renders it soft, a cloth of itself, will be sufficient to rub it off with. For chair polish, Sheraton mixed wax with a small quantity of turpentine, heated this in a varnish pan (a double boiler), added Oxford ochre for colour and a little copal varnish. The cooled mixture was worked into a ball and applied with a stiff brush, forced into the grain, and then rubbed off.
Wax finishes were widely used on high-style 18th-century French furniture. The only complete description of this process that I have found is in Roubo’s The Art of the Cabinetmaker.
For veneered cabinetwork, finest quality wax was melted into a polisher, which was a bundle of rags bound tightly with wire, and with which the whole surface was rubbed. The heat generated melted the wax, and the rubbing forced it into the pores. Roubo cautions against using cork polishers, which can get too warm and loosen the veneer.
When the wax was evenly spread, the excess was scraped.
off. Roubo’s wax scraper was similar to a cabinet scraper, but with a slightly rounded edge instead of a burr. Cleaned and polished with a rag, the work was ” extremely even, and glossy as a mirror.” For porous or reddish woods like rosewood or amaranth, powdered shellac was spread over the wax and rubbed in vigorously with the polisher to fill the open grain and heighten the colour. Colophony (rosin) was used to stop up open grain in black woods like ebony.
A high-gloss finish was typical of nearly all high-style furniture finishes of the 1 8th century. Experimenting with Roubo’s wax finish, I found that it gives a much higher gloss than we associate with wax finishes today. Roubo built up a wax finish in the same way as a varnish finish, and the wax became a fairly thick coherent body on top of the wood. And he used only 100 % pure beeswax, which has better refracting qualities than today’s wax emulsions.
Roubo prescribes a different process for common furniture the wax was mixed with one-third tallow and rubbed off with a serge cloth. ” In order to spread the wax better and drive it deeper into the open pores, one uses sometimes a sheet-metal pan in which glowing coals have been put, and this is held as close as possible to the work in order to warm the wax. In place of the pan one can also use a glowing red-hot piece of iron, which is even better, because it makes the wax liquid which flows into the open pores more easily.
Though it was possible to get a high gloss finish with wax, most finishers probably found the required method too time consuming.
Wax also has many of the same disadvantages as oil finishes. An 18th-century writer summarized the advantages and disadvantages of the common wax finish, noting: “Waxing stands shock; but it does not possess, in the same degree as varnish, the property of giving lustre and of heightening their tints. The lustre it communicates is dull, but this inconvenience is compensated by the facility with which any accident that may have altered its polish can be repaired, by rubbing it with a piece of fine cork.
Easy to obtain, fast and easy to use and repair, oil and wax finishes were ideally suited for 1 8th-century finishing needs.
Though pure beeswax finishes are rarely used today, the many virtues of oil finishes, particularly their low sheen, are once again appreciated and have made them a finish of choice, as they were 250 years ago.
Robert Mussey, of Milton, Mass., trained as a cabinetmaker and wood finisher then served an internship in furniture conservation at the Henry Ford Museum. He is head of the furniture conservation workshop at the Society for Preservation of New England Antiquities in Boston, Mass.